Showing posts with label fabric. Show all posts

Jul 6, 2012

Shabby Chic Jewelry-holder tutorial

 This is such an easy and thrifty solution to hang your jewelry from. If you're like me, you want to be able to see them so you can easily choose which piece you want to wear. And like most people, I had more wall space than I  counter space, so this was a great solution for me!


I found an old picture frame at the thrift store (the one with the velvet in-lay). This isn't the one, but I forgot to take a "before" picture--and this one's pretty close to what it looked like. I paid $1.00 for it.

 
 Next, I bought a subtle off-white paint sample at Home Depot. It was an "oops", so I paid $.50 for it.
I painted the whole thing a few times--taking special care to liberally coat the velvet. As soon as all coats were dry, I lightly sanded the edges and detail to give it an aged look. Then I drilled 5 evenly spaced holes in the velvet part.
 Also at Home Depot, I bought the cheapest wooden knobs I could find and painted them.
 This is what they looked like scuffed and installed. Cute, aren't they?
 Then, I stretched a piece of fabric (cut 1" bigger on all sides) over Dollar Store foam core using hot glue on the back.
 I decided at the last minute to add more hooks on the bottom.
 Here's the finished product. I also made one to hold my hair accessories by gluing vertical pieces of ribbon on it.
That's it! I have been absolutely loving it! Not only is it very functional and cleared up quite a bit of space for me, but it's such a fun way to add pops of color to a drab wall!

Mar 26, 2012

Easter Wreath

I've been wanting a new Easter Wreath. Especially after seeing the cutest idea from Pinterest. I had a spare morning today, so I decided to make a new Easter wreath. I was inspired by my daughter's birthday party color scheme from the weekend. I loved her colors so much, I decided I definitely wanted them on my door. ;)
Tutorial-
Step 1
 I gathered old plastic eggs from last year
and ribbon that fit the colors I was going for.
Then I made a wreath using a pool noodle
(Got the idea HERE- it's so smart.)
Step 2
 I grabbed some flannel and tore it into 3" strips.
Starting at an angle, I hot-glued the end and
wrapped it around. I ended up using 4 pieces.
No bigs--you can't tell when you're done.
 Step 3
 Next, I wrapped it with thin ribbon on a diagonal one
way, then did it again the opposite way making sure
they cross on the front. Then I glued ribbon on the eggs. 
Step 4- THE BOW
 Make a loop- pinching between your thumb and pointer finger.
Make another loop toward you, pinching in the center (or base)
of the bow. Add another, making the bow evenly balanced.
*THE SECRET TO A NICE BOW IS KEEPING YOUR
THUMB FIRMLY AT THE BASE THE ENTIRE TIME.*
While keeping your thumb in place, the under-side will be held
alternately by your pointer and middle finger (the strongest fingers).
As you accept a new loop, use the finger you didn't use in the last
and trade off for every other loop. Keep practicing...you'll get it.
Step 5
 Make as many loops as you'd like. I made these ones bigger than
I usually do. If you'd like tails, take the end and coil it onto itself.
I looped it twice here so I could have 4 tails. Secure with wire.
Pipe cleaners or string work, too. Fluff/arrange the loops of bow.
Step 6-ADDING TO THE BOW
 I sometimes like to add loops to my bows using different ribbon.
Make bunny ears, securing in the center with wire, then fold up.
Lift original bow's loops and add new loops to the base w/ wire.
Repeat as many times as you'd like. I added 4 "bunny ear" sets.
Step 7
 Decide where you want the bow, add a dab of glue, and place it.
Wrap around the back with wire. Trim tails and fluff your bow.
I know it looks like a WAY HUGE bow, but it trust me-
It needs to be so we have room to nestle all the cute eggs.
Step 8
 Now you're ready to add the eggs. Really, just glue and place.
If you're placing them on the sides of the bow, it's best to make
sure the egg's secured to the wreath itself, too. Otherwise, just
spread loops apart, and glue close to base. This is the fun part.

 Here it is finished. Look how different the colors look inside my
house as opposed to outside on my door. I prefer the sun-
kissed version--looks more "Easter-y"! I so love these colors!

Have fun with it! If you decide to make this wreath,
send me a link to your blog and show me!
I'd love to see your variation!

I'm linking up to-
Topsy Turvy Tuesday at I'm Topsy Turvy
Get Your Craft On at TCB
Take a Look Tuesday at Sugar Bee
Sew Cute Tuesday at Creative Itch
Show Me What Ya Got at Not Just a Housewife
Tuesday Tutorials at The Kurtz Corner
Turning the Daunting into Do-Able at The Project Queen

Feb 6, 2012

Repurpose baby blankets


I made myself a blankie. Yep, this one's mine. All my kids have their own "snuggle" blankies. I thought it was about time I made one for me! 
It's extra special to me because I made it out of my youngest daughter's crib bedding. I didn't feel the need to keep all that bulky bedding around, but it was still sentimental to me. So I reluctantly cut it allllll up.
I couldn't find a picture of her bedding, so I found this one, which is pretty close.
I got this image from-
http://www.distinctivenurseries.com/Lola-by-Maddie-Boo--4-Piece-Crib-Collection_p_3357.html

 I actually bought her set at Target about 4 years ago. Does anyone remember the cute Lola dots and stripes collection? Loved it.
Still do. :)

I cut it into 10" squares, arranged and sewed them together, backed it with pink Soft & Comfy Bubble Velour (A.K.A. Minky), and tied it with white string. I didn't even use batting. It really didn't need it (I live in a very warm climate, though. If you DO want to add batting for warmth, I suggest Warm & White Cotton).

NOW, you should go & dig up those old blankets and get workin'! :)

Jan 6, 2012

Easy Ribbon Wreath Hanger Tutorial

 How to lengthen your TOO-SHORT, boring dollar store metal wreath hanger and turn it into a ribbon hanger. Easy.

 Much cuter, don't you think?
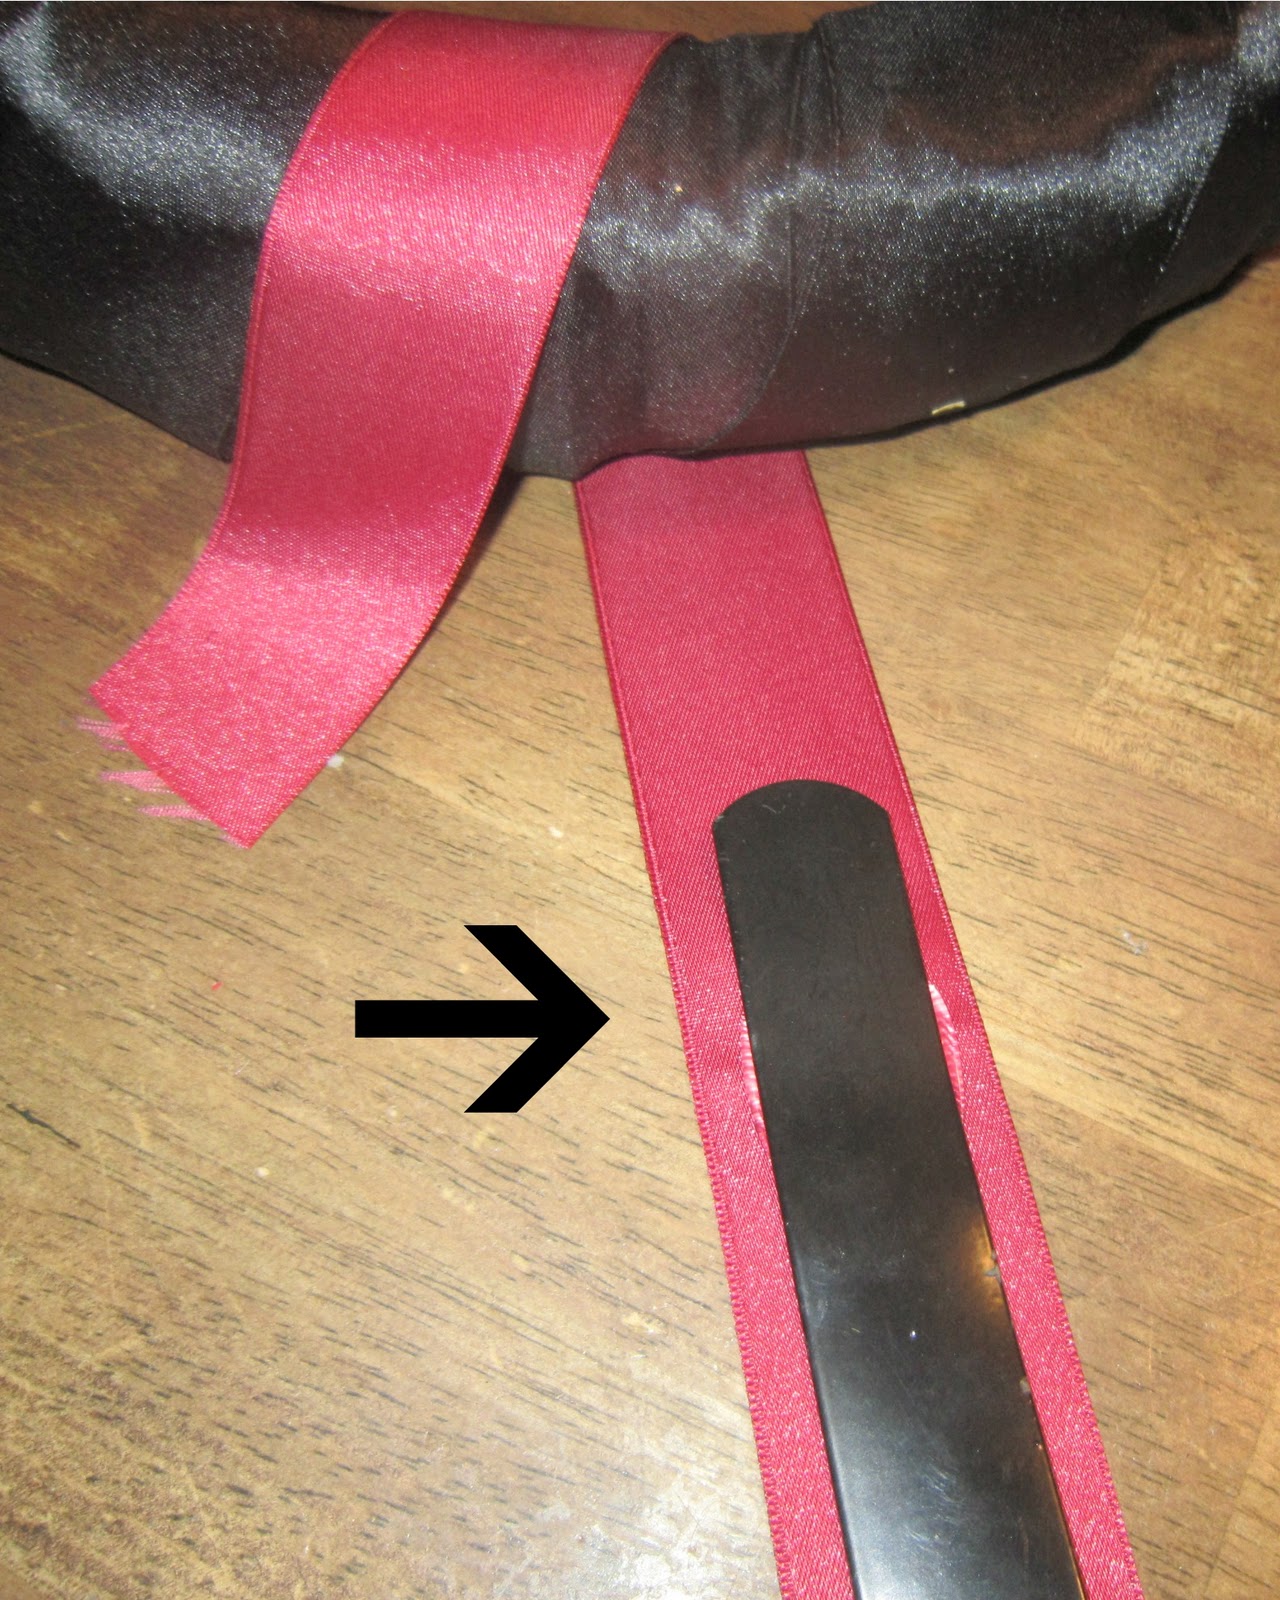
First, put a little glue on the top and attach a piece of ribbon (wider than your hanger).
 Next, straighten  out the "hook" part of the hanger.
 Put a dab of glue near the bottom of the hanger and stretch the same ribbon onto it.
Now, loop the end through your wreath/frame.
 Glue the end of the ribbon on to the back of the hanger.
 Turn it over and glue a bow on the front.
That's it!

You can make it as long as you want it!
Happy Crafting!
Click HERE for tutorial on how to make this wreath.

Felt & Fabric Flowers with Feathers Wreath in a Frame

Tongue twister!
No, that's not why I put an F on my wreath...
just coincidental. Haha! ;) Our last name is Foster.
Here's a little tutorial I've put together for ya. Complete with instructions/links on how to make each flower on this baby.
This is the finished product.
This is what it looked like before I decided to add a little to it. I thought it needed more presence.
I've been told I can't leave well enough alone. Oh well!
 THIS is what it looked like yesterday when I got it.
I intercepted it as it was destined for the thrift store.
I couldn't wait to transform it!
 I peeled off it's pink tinsel layers and found the wreath to be like new!
I loved that one part was thicker than the rest, too! Perfect place to put the flowers.
 I wrapped it in 2" wide black satin ribbon,
 gathered my fabric/felt/ribbon/feather scraps,
 and made these flowers.
The tutorials for these are
HERE (Big Ruffled Silver one),
HERE (Two-toned Red & Black ones),
HERE (Black Petal one on far left)
HERE (Small Rolled Rosettes), and
HERE (Fluffy, Loopy Felt ones).
 I hot glued them right on the ribbon.
 Here are all the flowers on it.
 Then I added the feathers.
 This was originally the finished product.
By the way,
HERE's a tutorial on how to turn your regular, short, plain dollar store wreath hanger into this ribbon hanger.
But then I decided I wanted to add an "F" for Foster.
So, I (very sloppily) cut it out of some pre-used foam core.
 The pics uploaded sideways. Oh well.
I wrapped it in torn fabric strips,
 then added a flower and some feathers.
 I glued the F onto the wreath, and hot-glued the wreath onto an empty picture frame.
 And now it hangs on my door.
:)

Petal Felt Flower Tutorial

This is a fun one, too! The picture doesn't do it justice. It really is a cute flower!
First, cut out a bunch of petal shapes.
Put a line of glue on the bottom of the first petal.
Roll up and add a couple more petals, doing the same thing. This makes your center.
 Continue to add one petal at a time...pinching the base of each petal together before adding it to the flower--to pucker it a little.
 Add as many as you'd like. I made my flower kind of small--only because I ran out of felt. Haha! I'd normally run to the store, but I do most of my crafting in the middle of the night while my kiddos are sleeping.
I added a pearl to the center so it would match my project.
HERE's the finished project, if you'd like to see it all together.

Ruffled, Singed-edge Fabric Flower Tutorial

This is one of my FAVORITE fabric flowers ever!
For this one in the picture, I used taffeta, but you can use any fabric that will singe.
First, you tear a 2" strip. I probably used about 24" in length for this big flower here.
Singe the edges...only be kinda messy about it.
 I love the rustic look of these edges! Especially when made into a flower!
 Next, sew a basting stitch down the center. Don't worry if you're off a little.
I think it looks better with a little irregularity to it-- more natural. Ya know?
Now gather it.
 Fold it in half length-wise, using the stitching as your fold-line. I folded the gray sides together. You can lightly iron it if you have a hard time keeping your fold together.
Now, put a dab of glue on your starting edge, and coil it to form a center.
 Continue to glue and coil until desired size is reached. Glue bottom of flower to a felt circle...to keep it clean and give it a little extra integrity.
Done! Fancy, eh? I especially love two-sided fabrics for these!
Click HERE if you'd like to see what I ended up making with these.
Related Posts Plugin for WordPress, Blogger...